How to use OneDrive’s Personal Vault feature to work better and safer
![]() 5 min. read
5 min. read
![]() Published on
Published on
Share this article

Improve this guide
Read our disclosure page to find out how can you help Windows Report sustain the editorial team Read more

While going about your day, you’ll find that you often interact with a lot of files. In some instances, you might even find yourself handling delicate and classified information that you may prefer to keep private and away from unauthorized users.
OneDrive will help keep your files safe, It’s a cloud storage solution that allows you to keep your files in sync on all your devices.
Not only does the application let users protect and store files safely, but it also allows users to share files with others. What’s more, users also get to access the files from anywhere on any device.
Aside from these capabilities, OneDrive also allows users to password-protect important files with the Personal Vault feature. It’s a neat feature that provides an extra layer of protection for your files and folders.
Note: It’s worth noting that the Personal Vault feature is only available for OneDrive home and personal plans, therefore you’ll not be able to access it via your work or school account. You can also access it via OneDrive on the web, the mobile app, and from your Windows 10 PC.
In this guide, we’ll walk you through the process and show you how to skillfully password-protect important files on your Windows PC using the Personal Vault feature. Here’s what you need to do:
How to set up Personal Vault
Before proceeding to set up this feature, it’s important to know what it is first. According to Microsoft:
Personal Vault is a protected area in OneDrive where you can store your most important or sensitive files and photos without sacrificing the convenience of anywhere access.
Now that you’ve acquainted yourself you can now proceed to set up the feature by:
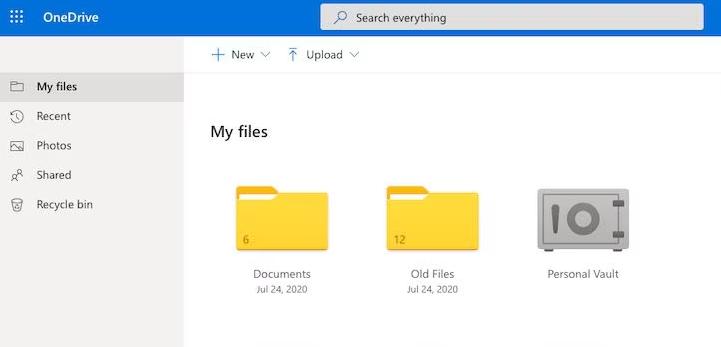
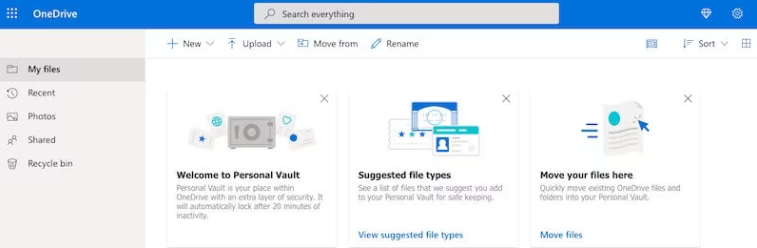
- Launch the Microsoft OneDrive app and head to the My files section on the homepage and select the Personal Vault folder.

- A small window will pop-up with a prompt asking you to Verify your identity. You might be requested to provide your email address and even phone number.
- Next, you’ll need to set up a verification method. If you selected text or email, a unique code will be sent to you that you’ll need to key in to access your Personal Vault.
How to upload files to your Personal Vault
Since you’ve already set up Personal Vault, you now need to know how to upload important files and secure them with the feature.
Note: Users without a Microsoft 365 Family or Personal subscription can only upload up to three files in the Personal Vault. Those with active subscriptions can upload as many files as they’d like dependent on the storage space they have left.
- Launch the OneDrive app, and select the Personal Vault.
- Next, you’ll need to sign back into your Personal Vault folder using the identity verification method you selected (email/text).
- Select Upload and choose all the files you want to store in the Personal Vault folder, then select Open once you’re done.
Important: OneDrive’s mobile app lets users scan documents, take pictures, or shoot videos directly into their Personal Vault. This, in turn, prevents you from storing important and classified documents in accessible areas on your device.
How to move files from OneDrive to Personal Vault
While you now know how to upload files from your device to your Personal Vault, you might also want to add an extra layer to files that you’ve stored in OneDrive and opt to move them to the Personal Vault. Here’s what you need to do:
- Launch the OneDrive app and select the Personal Vault.
- Next, you’ll need to sign back into your Personal Vault folder using the identity verification method you selected (email/text).
- Now, select all the files you’d like to move to the Personal Vault and click on Move Items. Alternatively, you can drag the selected files onto your open Personal Vault.

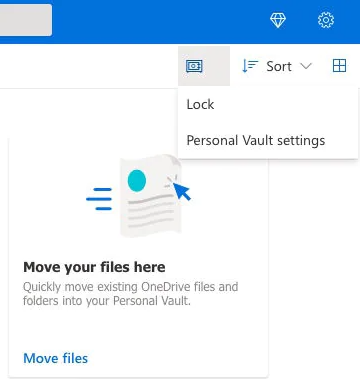
How to lock and unlock your Personal Vault
If you’ve managed to set up and move important files to your Personal Vault. It’s important to learn how to lock and unlock the Personal Vault so that you can access your files whenever you want.
Here’s how to unlock the Personal Vault feature:
- Launch the OneDrive app on your Windows PC and select the Personal Vault folder.
- Next, verify your identity by using the verification method you have set up and enter the code sent to you via email or text.
Tip: You can opt to unlock your Personal Vault using the Microsoft Authenticator app. It’s quite convenient as you’ll not need an internet connection to generate an access code.
Here’s how you can lock your Personal Vault once you’re done uploading and using the files stored there:
- Head to OneDrive’s homepage and select the Personal Vault folder.
- Next, select the Personal Vault options icon, and then select Lock.

Secure your files with the Personal Vault feature
Protecting a folder or file with a password is an easy way to keep people out of your stuff if you’re sharing files with someone who doesn’t need to see everything in the folder. The Personal Vault feature will help keep your classified files private.
We hope that the above steps were able to help you password protect your files using OneDrive’s Personal Vault feature. Do you use the feature to protect your files? Share your experience with us in the comments.


Featured image via Bing Image Creator