How to upgrade the SSD in the Surface Laptop 3
\n
Although it is recommended that users only upgrade or service a Surface Laptop 3 or Surface Pro X at Microsoft or authorized retailers, you can technically still upgrade the SSD in these devices on your own. If you have technical experience fixing computers, the process will be easy. Here’s how to upgrade the SSD on the Surface Laptop 3
\n
- \n
- Buy an M.2 2230 SSD, priced around $100 for 512GB
- Gather the necessary tools: A T5 Torx screwdriver, an opening pick, and tweezers.
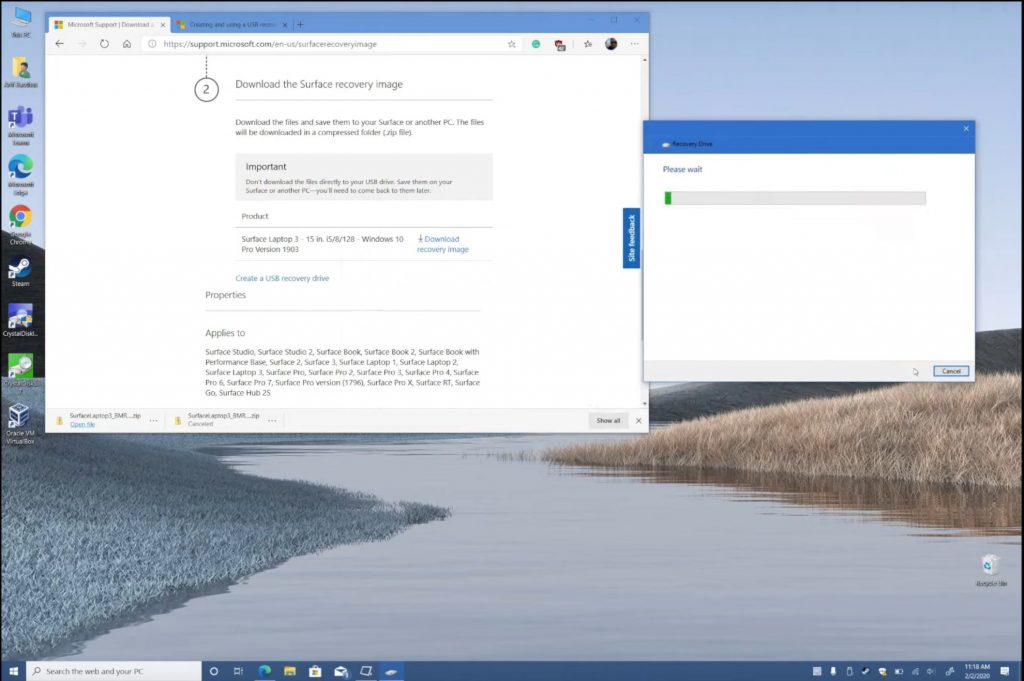
- Visit Microsoft’s support website and download a recovery image for your Surface device, and create a recovery drive for it.
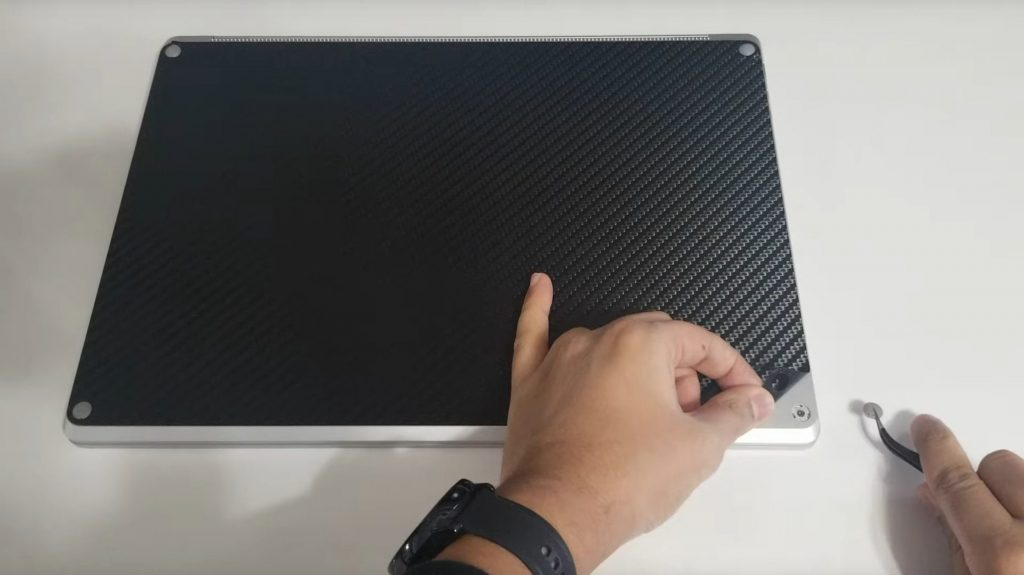
- Power off and place the Surface Laptop 3 on the table with the screen down, and with the lid closed and remove each of the four rubber feet on the bottom.
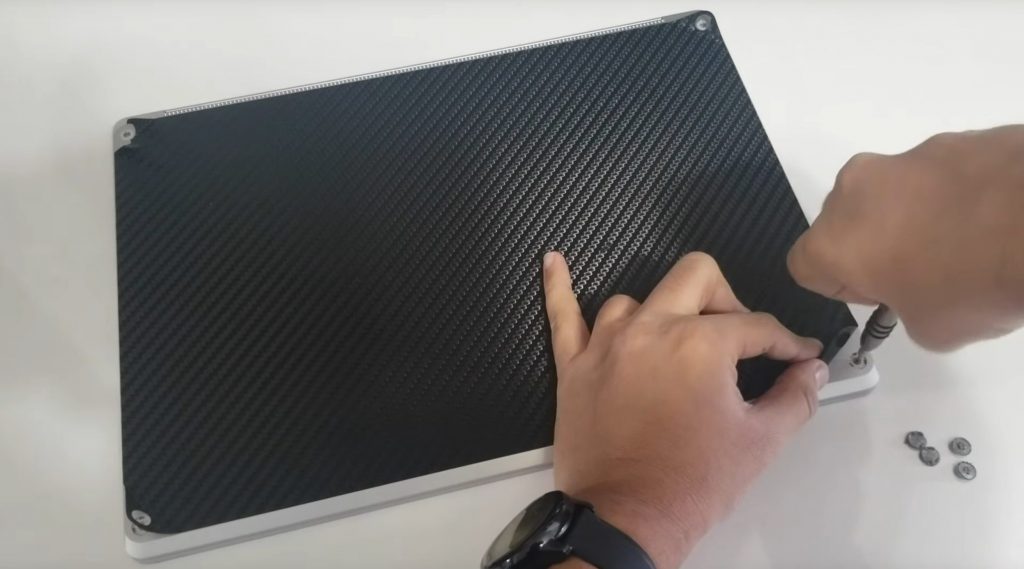
- Unscrew each of the four screws under the feet.
- Flip the Surface Laptop 3 back over like normal, and pry off the keyboard deck, starting from the edge closest to the vent.
- Look for the SSD in the top left corner, and unscrew the screw, put the new one in place and put back the screw.
- Put everything back together, with extra care to make sure the rubber feet are back in place.
- Re-install Windows 10 with your recovery drive.
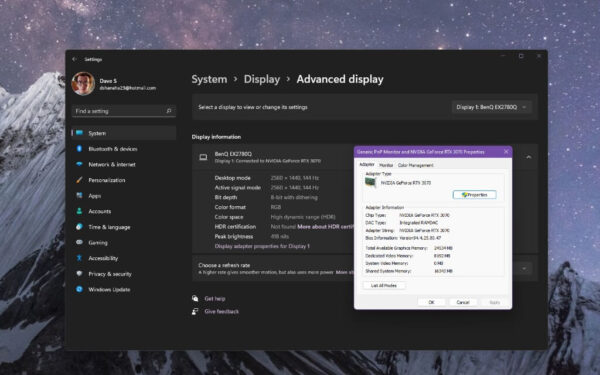
- Verify all drivers are present, and that the SSD is being read by Windows.
\n
\n
\n
\n
\n
\n
\n
\n
\n
\n
\n
\n
Applies to All Windows 10 Versions
\n
\n
When Microsoft took the wraps off the Surface Laptop 3 in October of 2019, Panos Panay showed how easy it was to service or “upgrade” the device. The keyboard deck lifts up, and the SSD could be replaced. This sort of thing was unheard of in a Surface before, as iFixit famously called the Surface Laptop a “glued together monstrosity.”
\n
Now, although it is recommended that users only upgrade or service a Surface Laptop 3 or Surface Pro X at Microsoft or authorized retailers, I decided I would take a risk and try to upgrade the SSD on my Surface Laptop 3 on my own. I felt especially confident in my computer repair skills, especially after how Panos showed how easy an upgrade could be. I also desperately needed more space, as the 128GB SSD on my Surface Laptop 3 15-inch filled up quicker than I liked.
\n
So, here’s a look at how I got it done, and why you might want to do it too if you’re the risky type. But, be warned, this isn’t meant to be an official repair guide, it’s just a personal look at how I upgraded the SSD on my own. If you decide to follow my guide, you’ll be doing it at your own risk, and we can’t be held liable for any damages to your device.
\n
It’s also worth noting that I’m sporting the 15-inch Surface Laptop 3, with the metal keyboard deck, so the steps might be different if you’re using the Alcantara version. Microsoft has an in-depth repair guide for the Surface Laptop 3, which you can read here if you’re looking for more official instructions.
\n
Prerequisites
\n

\n
Before upgrading the SSD in my Surface Laptop 3, I made sure I met a few prerequisites. There are a few tools I needed to have handy: A T5 Torx Screwdriver, an opening pick, and tweezers. These were all in my iFixit toolkit, which I purchased for $35 many years ago.
\n
Asides from the tools, I also needed to have an 8GB USB drive handy so I could create a Surface Recovery drive to reinstall Windows. I also used a separate backup HDD to create an image of my Surface as I last left it, and to back up my files. Of course, I needed to have a new SSD too, which I purchased from eBay for $93. Here’s a look at where you can get one too.
\n
| Retailer | Price | Product Name |
|---|---|---|
| CDW | $93.99 | WD PC SN520 NVMe SSD – solid state drive – 512 GB |
| NewEgg | Out of Stock | SanDisk PC SN520 512GB m.2 2230 |
| Ebay | Out of Stock | SanDisk PC SN520 512GB m.2 2230 Internal Solid State Drive – SDAPTUW |
| AvaDirect | $95.62 | 512GB PC SN520 2230, 1700 / 1400 MB/s, 3D NAND, PCIe 3.0 x2 NVMe, M.2 SSD |
| Insight | $100 | WD PC SN520 NVMe SSD – solid state drive – 512 GB – PCI Express 3.0 x2 (NVMe) |
\n\n
Keep in mind, if you’re buying a new SSD for your Surface Laptop 3, you’ll need to buy a M.2 2230 SSD. This specific size is a new format designed for thin and light notebooks. Standard M.2 SSDs won’t fit, so please be aware.
\n
Step 1: Backups and Recovery Drive
\n
\n
Before digging into my Surface Laptop 3, I did a backup. The first step in this process is visiting Microsoft’s Surface Support website and downloading a recovery image for the Surface Laptop 3. I needed to input my serial number for the download. Once it finished, I searched for Recovery Drive in Windows and launched the Create a Recovery Drive program. I made sure to uncheck the box to backup system files, and then let the wizard create the drive. This wizard creates a recovery USB which will let you boot your Surface to clean install Windows on the new SSD. Specific directions on this are available from Microsoft here.
\n
When done, I unzipped the freshly downloaded Surface Recovery image and copied all its contents over to the just created recovery USB. When that was done, I also created a system image just to be safe. This can be done by searching for System Image in the search box, clicking Backup Settings and choosing Backup and Restore Windows 7, and selecting Create a system image. This system image is an exact copy of the SSD as last left. While I was at it, I also copied my files and folders manually to a separate partition on the drive with the system image, just to be safe.
\n
Step 2: Remove the rubber feet on the Surface Laptop 3
\n
\n
With backups done, the next step was to dig into the Surface Laptop 3. To do this, I powered off and placed the Surface Laptop 3 on the table with the screen down, and with the lid closed. I used a tweezer to pull out each of the four rubber feet. In my time, I accidentally scratched up and “mangled” the feet in the process., but I was still able to reuse them later on. However, if you read Microsoft’s documentation, you’ll see specific directions on how to position your pick tool or tweezer to avoid damaging the feet.
\n
It’s worth noting that these rubber feet have clips on them. As I pulled them out, I was careful not to damage the clips. These help secure the feet in the chassis. The rubber feet on the top side of the Surface Laptop 3 closest to the vent also have double-sided tape attached to them, so I was careful to keep the tape in place so it can be pushed back in.
\n
Step 3: Unscrew the four screws under the feet and pry off the keyboard deck.
\n
\n
Once I finished removing the feet, the next step was the easiest. All I had to do was unscrew each of the four screws under the feet. I put the screws to the side in the same order and format as I removed them, just to be safe.
\n
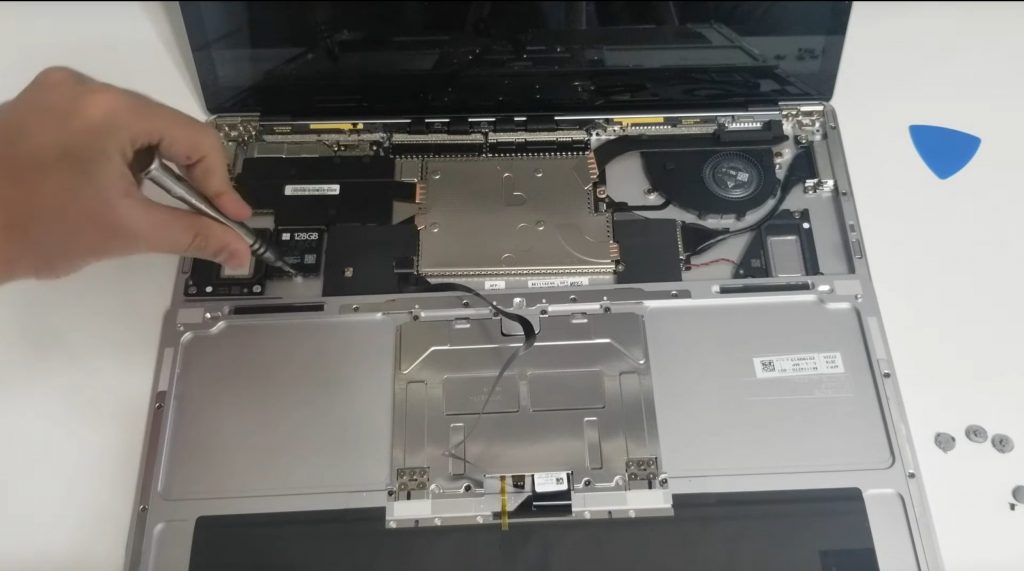
When the screws were out, I opened back up the Surface Laptop 3 as I normally would, and pried off the keyboard deck. I pulled the keyboard deck up from the side closest to the screen, just to be safe, and then ran my fingers along the side until the magnets released it. There was a ribbon cable in the middle, so I was careful not to cut it. Microsoft actually recommends you unplug that ribbon that attaches the keyboard to the motherboard once you’ve taken the keyboard deck off, but I skipped this step in my process. You might want to disconnect it just to be safe.
\n
Step 4: Remove the SSD
\n
\n
Keyboard deck removed, the next step for me was to unscrew the SSD. It’s housed in the top left corner, and a single T5 Torx Screw holds it in place. Once the screw was removed, I slid it out and put the new one in its place, and put the screw back in place.
\n
It’s worth noting that the factory Microsoft SSD has a heat shield and caddy attached to the bottom of it. Since I wanted to keep my Surface Laptop 3 in the original condition, I didn’t remove this heat shield and did not put it in the replacement SSD.
\n
You might want to remove this shield you want and put it on your new SSD. However, I wanted to keep the original Microsoft SSD in its factory condition just in case there are future issues with my Surface. This way, if I wanted to go in for a warranty or support issue, I’d just repeat this process and pop the original SSD inside.
\n
Step 5: Put everything back together
\n
\n
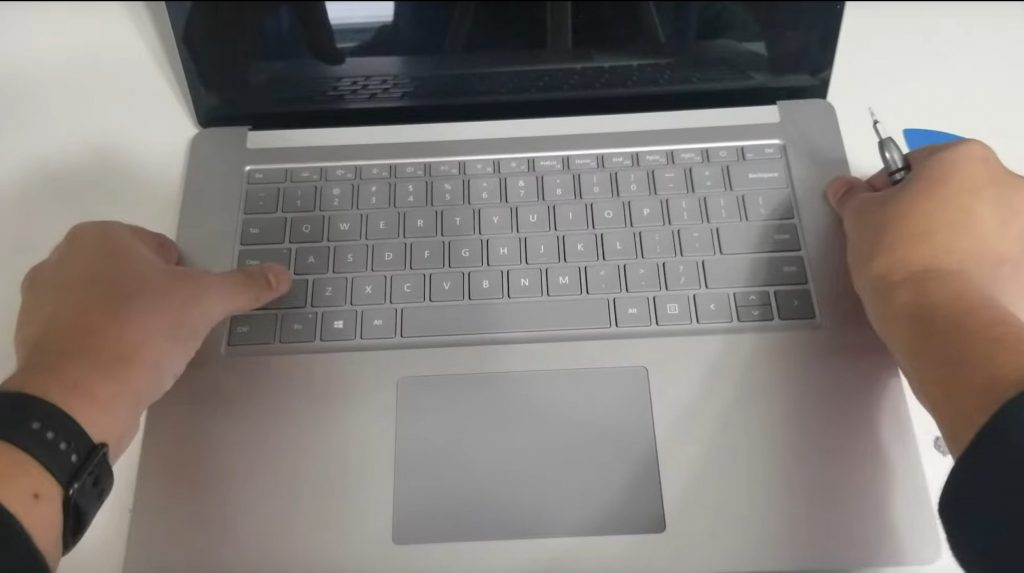
With the new SSD in, it was time to put everything back together. This was just as easy as taking things apart. The keyboard deck snapped right back into its place in the chassis thanks to the magnets. Once it was secure, I flipped the Surface Laptop 3 back on its lid and put the four screws back in. I then pushed the four rubber feet back in place. This was tricky, as I needed to make sure that the feet were secure. A little “click” noise confirms that the feet are back in their original place and secure, but it takes some patience to fit them in just right.
\n
Step 6: Re-install Windows 10
\n
\n
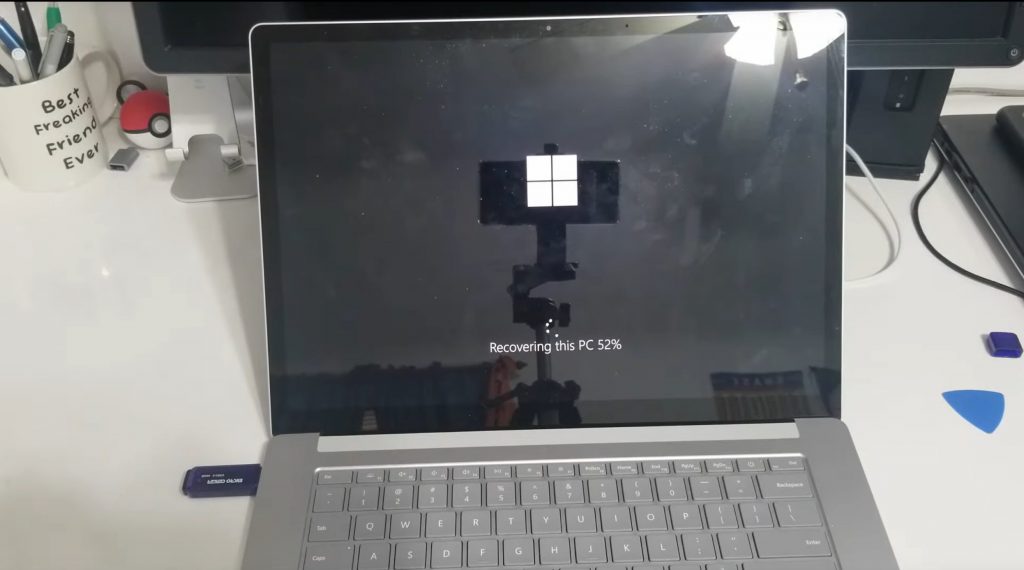
The final step in upgrading the SSD in my Surface Laptop 3 was to re-install Windows 10. To do this, I plugged the recovery USB created in step 1 into the Surface Laptop 3. I held down the power button and volume down button for 15 seconds and then released to let the Surface Boot from the USB. I followed the on-screen instructions and installed Windows 10 the new SSD. The Surface rebooted a few times, but, once done, I ended up verifying all the drivers were good with Device Manager. Everything worked like a charm, and my new 512GB SSD was being read by Windows! Awesome!
\n
Why the upgrade is worth it
\n
Although I damaged the rubber feet in my Surface Laptop 3 while upgrading the SSD, I think it was well worth it. I now have more storage space and the write speeds on the drive are much better. The default Hynix drive included by Microsoft only gets to write speeds of around 300 MBs. This new 512GB SanDisk drive that up that all the way to an insane level of 1,400 MBs. That difference is substantial. I’m quite glad to see that Microsoft made it easy for such upgrades, and I hope future Surface devices are just the same.
\n